Say goodbye to unwanted hair with the help of a waxing kit, allowing you to have salon-smooth skin from home! Mastering how to use an at-home waxing set is more than just a convenient way for effective hair removal - it’s an empowering skill that makes achieving smoothness easier. In this guide, we’ll go through all the steps necessary in using such kits properly.
So let’s get right into it and start discussing how exactly one can make full advantage of their own personal waxing equipment! From learning what kind of products should be purchased, preparing your waxed items beforehand, and performing successful application methods. Every section will provide valuable advice so that anyone could benefit from having smooth skin within moments without stepping out of house or spending too much money.
Key Takeaways
-
Unbox your waxing kit and prepare a clean, well-lit space to get started.
-
Heat up the wax safely and test it on your wrist for optimal temperature.
-
Follow application techniques, use aftercare products post-waxing & exfoliate regularly for smooth results!
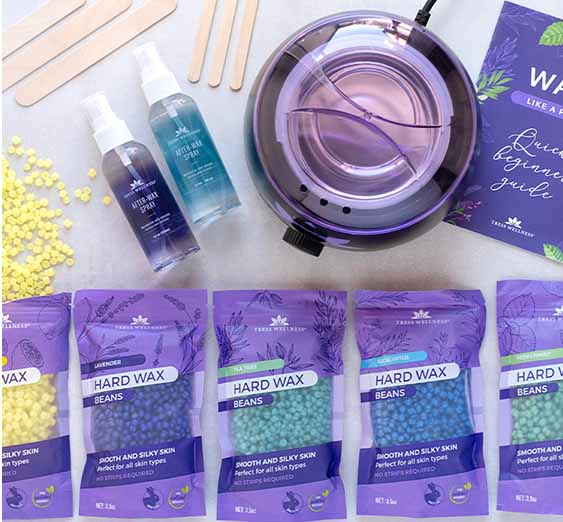
Unboxing Your Waxing Kit: What's Inside?

Imagine the thrill of unboxing your new Tress Wellness home waxing kit - it's like being a kid on Christmas morning! This kit is your ticket to transforming your own home into a personal wax studio. The Tress Wellness Waxing Kit is a comprehensive set that includes everything you need for a smooth and comfortable at-home waxing experience. It contains:
-
Wax warmer with an LED indicator, temperature-adjusting dial and protective lid.
-
Hard wax beads in five delicious scents--peppermint, eucalyptus, lemon, lavender and tea tree.
-
Handy applicators--20 large spatulas and 10 small spatulas--for every nook and cranny of your body.
-
Pre-waxing sprays to prepare your skin for the process.
-
Post-waxing sprays to soothe and comfort your skin after waxing.
-
5 protective paper rings
-
Waxing manual on how to wax like a pro.
This kit definitely doesn't skimp on supplies! When used correctly, these products promise an effective hair removal session and a clean, residue-free finish - something you'll surely be excited about! So why wait? Dive into the world of at-home waxing with the Tress Wellness Hard Waxing Kit and experience the joy of salon-smooth skin right at home.
Preparing for Your Waxing Session: Setting the Stage
Preparing for a waxing session at home can be a breeze if you know how to set the stage right. Here are some easy-to-follow steps to help you create the perfect environment for a smooth and successful waxing experience:
Heating Up: The Right Way to Warm Your Wax
Finding the perfect temperature for your waxing session is akin to seeking the right bathwater temperature - it shouldn't be too cold or too hot, but just perfect. So, how does one achieve this with the Tress Wellness waxing kit? Here are some steps to follow:
-
Choose your heating tool: The Tress Wellness waxing kit comes with a professional-grade wax warmer. This is your go-to heating tool.
-
Handle with caution: Remember, you're dealing with heated wax. It's crucial to handle it carefully to avoid any burns.
-
Ensure even heating: When heating the wax, make sure the heat is evenly distributed throughout the wax. This ensures a smooth hair removal session without any hitches.
-
Achieve the right warmth: Getting the wax to the right temperature ensures that all areas with dense hair are covered uniformly during the application, leaving you satisfied with the results.
In the upcoming sections, we'll delve deeper into the specifics of achieving the ideal wax temperature while keeping safety measures in mind using the Tress Wellness waxing kit.
Testing Wax Temperature
Before we delve into the actual waxing process, it's crucial to understand how to test the temperature of the wax. Getting this right is a key step in ensuring a safe and effective waxing session. Let's look at how you can accurately test the temperature of your wax.
-
Prepare a small amount: You can test this by putting a little drop of the heated wax on your inner wrist.
-
Assess the sensation: The sensation should be cozy but not scalding hot. If too warm, possible burns or irritations could occur and if too cold, there won’t be proper coverage when eliminating hair.
-
Know your wax type: It ought to be noted that different types of wax will require their own specific temperatures for optimal use:softer types like bikini wax are typically heated to 86-104°F, while harder waxes should be melted at a higher temperature, between 150-175°F.
-
Read the instructions: Be certain to read up properly on the guidelines associated with the Tress Wellness waxing kit for best results!
Applying the Wax: Mastering the Technique
Applying the wax correctly is crucial to a successful waxing session. Here are some steps to help you master the technique:
-
Cleanse the area: Begin by cleansing the area you're about to wax. This will help remove any oils or lotions that could hinder the wax from adhering properly.
-
Pick up the wax: Using the spatula provided in your Tress Wellness hard wax kit, scoop up a generous amount of the melted wax. Make sure the wax is sticking to the spatula before you proceed to the next step.
-
Apply the wax: Hold the spatula at a 45-degree angle to your skin. This allows for a more controlled application. Spread a thin layer of the Tress Wellness hard wax onto your skin, following the direction of hair growth. Ensure the wax is spread evenly for consistent results.
-
Let it cool: Allow the wax to cool and harden slightly. This will make it easier to remove.This will make it easier to remove. But before you let it cool completely, curl a small section at the end of the spread wax upwards. This will act as a grip when you're ready to remove the wax.
Removing the Wax: The Perfect Pull
Removing the wax correctly is just as important as applying it. Here's how to ensure a clean, smooth pull:
-
Check the wax: Before you remove the wax, ensure it's cooled enough to be hard but still flexible. If it's too soft, it won't effectively remove the hair. If it's too hard, it could shatter, making it difficult to remove.
-
Pull the skin taut: Use one hand to pull the skin taut in the direction opposite to the wax application. This will help minimize discomfort and make the hair easier to remove.
-
Remove the wax: With your other hand, swiftly pull the wax off in the opposite direction of hair growth. Try to keep the motion parallel to the skin rather than pulling upwards to reduce discomfort.
-
Clean the area: After you've removed the wax, cleanse the area again to remove any residual wax and soothe the skin.
Here's a complete video tutorial on how to use the Tress Wellness waxing kit at home:
@tresswellness_waxingkit How to wax arms at home, quick and easy! #waxing #armwax #howtowax #waxkit #hardwax #USA ♬ original sound - Tress Wellness Waxing Kit 💜
We do a bunch of blogs on waxing body parts. Get your own guide to bikini waxing, Brazilian waxing, leg waxing, arm waxing and face waxing. We also do blogs on men's waxing. Check out our blogs on chest waxing, back waxing, beard waxing and mankini waxing for men.
Calming Your Skin: Aftercare Essentials
After waxing, proper aftercare is crucial in the recovery process. One of the best ways to soothe skin sensitivity is by using the Tress Wellness Post-Waxing Spray, which is conveniently included in the waxing kit. This specially formulated spray is packed with natural ingredients that provide calming and anti-inflammatory properties.
The Tress Wellness Post-Waxing Spray is designed to aid in the healing process and protect the skin from irritation. It contains a blend of essential oils and botanical extracts that work together to soothe, moisturize, and nourish your skin.
To avoid common mistakes during waxing, it’s important to understand how to protect their sensitive skin and from irritation while using post-treatment care items like the Tress Wellness Post-Waxing Spray. Regular use of this product can contribute to the overall health of your skin. Keeping this knowledge in mind will help you prevent any skin injuries or complications down the line when dealing with your routine beauty regimen involving waxes and depilators.
Common At-Home Waxing Pitfalls and Tress Tips to Avoid Them
At-home waxing comes with its own set of advantages, but it's also not without potential pitfalls. Here are some common mistakes you might encounter, along with some handy Tress Tips to help you avoid them:
Mistake 1: Using Too Much or Too Little Wax Using an incorrect amount of wax can lead to ineffective hair removal.
Tress Tip: Ensure an even distribution of suitable amount of hot and cold wax strips on areas for the hair removal method for optimal results.
Mistake 2: Skin Irritation from Multiple Passes Over the Same Area Repeatedly waxing the same area about a week can cause discomfort or burning sensation if done inappropriately.
Tress Tip: Don’t repeat the waxing process on the same spot. One pass should be enough if done correctly.
Mistake 3: Incorrect Pulling Direction Leading to Burn Marks Pulling in the wrong direction can lead to burn marks and skin irritation.
Tress Tip: Quickly pull out strips against the direction of hair growth. Remember to hold the skin taut for a cleaner pull.
Mistake 4: Not Taking Extra Care with Sensitive Areas Sensitive areas like bikini lines require extra care when waxing at home.
Tress Tip: Always opt for the right type & quantity of strips while simultaneously making sure it’s pulled in the opposite side compared to where hair are grown.
Remember, wax at home responsibly so that everyone enjoys successful results!
Navigating Sensitive Areas: Special Considerations
When it comes to waxing sensitive parts of the body, such as the bikini line or face, extra caution needs to be taken. Here are some tips you should remember when dealing with these areas: Prep your skin by washing and exfoliating before beginning, use suitable wax for delicate complexions like soft gel or hot waxes, and abide by appropriate procedures while applying/removing hair-removal solutions. In cases of any existing inflammation, rash, or ingrown hair, postpone using a depilatory until issues have calmed down in order to prevent exacerbating them. After all is said & done, make sure you soothe exposed epidermis post-waxing utilizing fragrance-free cream or aloe vera gel in order to keep irritations away!
Maintaining Smooth Results: Long-Term Care

Maintaining a silky, hairless epidermis between wax appointments is much simpler than you might think. Frequent exfoliating and hydration are your number one instruments to complete this task. Exfoliation can help take away dead skin cells which have the potential to clog hair follicles thereby reducing ingrown hairs and allowing for smoother skin prior to each subsequent waxing session.
Hydrating after having been through hot wax is essential in order of calming the dermis as well as sustaining its velvetiness. Make a hydrating moisturizer your bff post-waxing.
To wrap up then: consistent exfoliation paired with proper moisture care go hand in hand when it comes down to maintaining smoothness throughout our epidermal tissues before the next required removal of body hair by waxing.
Frequently Asked Questions
Can I use a waxing kit on my face?
Yes, you can use a waxing kit on your face. However, it's important to use a wax that's specifically designed for facial use to avoid irritating your skin. Always do a patch test on a small area of your skin first to ensure you don't have an adverse reaction.
How long does the hair need to be to wax?
The optimal length for waxing is between 1/4 and 3/4 inches long. If the hair is too short, the wax may not be able to grip it properly. If it's too long, the process could be more painful and the wax may not be able to remove all the hair at once.
@tresswellness_waxingkit How long should hair be for waxing? 🤔 comment if you know! #waxing #hardwax #bodyhair #howtowax #waxingforbeginners #USA ♬ My Addiction - Alex Guesta
How often should I wax?
The frequency of waxing can vary depending on the individual's hair growth. However, most people find they need to wax every 3-6 weeks.
Can I wax if I have sensitive skin?
Yes, you can still wax if you have sensitive skin. However, you should use a wax that's designed for sensitive skin, and always do a patch test first. It's also a good idea to apply a soothing lotion or cream after waxing to help calm any redness or irritation.
What should I do if I get a rash or bumps after waxing?
If you get a rash or bumps after waxing, applying a cool compress can help to soothe the skin. You should also avoid heat and friction on the area for 24 hours after waxing. If the rash or bumps persist for more than a few days, you should consult a healthcare professional.
What should I put on my skin before waxing at home?
Waxing can be made virtually painless by applying oil beforehand, which also provides a protective layer on the skin and helps to attract wax unwanted body and hair follicle, so that it clings more effectively to the hair rather than sticking directly onto one’s skin.
How do you wax your pubic area with hard wax?
For best results, spread a light coating of wax on the area in the direction of hair growth. Afterward, remove wax residue, in the opposite direction that your hair grows for smooth skin. Clean with azulene oil or baby oil once finished to complete treatment successfully. This will help you get rid of unwanted hairs in an effective way by pulling them against their natural growth pattern!
@tresswellness_waxingkit How to do a bikini wax ✨ #bikiniwax #waxing #hardwax #waxkit #USA #bikini ♬ original sound - Tress Wellness Waxing Kit 💜
How do I remove leftover wax after waxing?
You can clean off any residual wax with the after-wax spray provided in your waxing kit, or else employ natural oils such as olive oil or jojoba for gentle and effective removal from the skin.
How can I soothe my skin after waxing?
To pamper your skin after waxing, consider combining aloe vera and tea tree oil as a calming topical treatment or use specially formulated post-wax products for optimal protection.
There you go! That's your complete guide to using a waxing kit. What are you waiting for? Go get yours now!


