Little baby hair poking out on your arms and legs? Got some stray staches in the corner of your lips? Have a beach day planned with your friends but haven’t waxed down there? These are the moments when you wish you could wax yourself.
Picture this: No more scheduling conflicts, no more awkward small talk with your waxing technician, and definitely no more compromising on the quality of your hair removal.
Wish you could do it all at home? With the best at-home waxing kit and a little guidance from us, you can be a pro-waxer too!
In this blog, we will tell you why at-home waxing is your best bet, what supplies you need to wax at home, give you a step-by-step home waxing guide, and spill the best-kept pain-free waxing secrets.
Read on to unlock some waxing wisdom!
Why Waxing at Home Might be the Best Option for You
You enjoy your convenience and privacy
When you wax yourself at home with a wax kit, you allow yourself a whole lot of convenience and privacy. You can schedule your waxing session according to your convenience.
Bonus for you if you like privacy during a bikini or Brazilian wax. Not everyone is comfortable with a professional snooping around their nether regions with a spatula. For them, at-home wax kits are a savior!
No one understands your pain tolerance better than you do
It is absolutely false that waxing hurts a lot less when you get it done by a professional. Waxing pain is very subjective and individual. Only you can truly understand your pain tolerance. Waxing with an at-home waxing kit gives you the freedom to do the process at your own pace, be as gentle as you need it to be and take frequent breaks to recover from the pain.
You can keep waxing hygienic and skincare personalized
Contamination of waxing equipment at the salon is a huge turn-off. And there’s no way to know whether they have been sanitised. In most places, the wax pot is cleaned after a whole day of waxing sessions with multiple clients.
The risk of contamination cannot be ruled out altogether, even if you are going to a high-end salon. At home, you get to work with your own waxing kit that has not been used by anyone else. You can wash and sterilize your warmer and spatulas.
On top of that, you get to use your favorite skincare to prep and soothe your skin. You can use targeted skincare, pre-wax and after-wax care, that is made for your skin concerns when you are waxing at home.
You do not need to break the bank
Think about all the money that you can save by waxing at home! A full body waxing at the salon costs you somewhere around $300-400!! Multiply that a few times if you are a frequent waxer, and you’ll have enough money for a fancy vacay!
Ouch! The pocket pinch hurts a lot more than the actual waxing, doesn’t it? Waxing at home will get the work done as effectively but for a lot cheaper. Getting the Tress Wellness at-home waxing kit is a long-term investment and costs you much less than a salon visit.
With an at-home waxing kit, you get a full body wax for months for just 60 bucks!
Keeping it Smooth: How to Prep Your Skin Before You Bring Out Your Waxing Kit
For a smooth, bump-free waxing experience, it’s crucial that you prep your skin leading up to the day of waxing. Here are a few things that you can do to prep your skin and keep your waxing game smooth.

Before you bring out your home waxing kit, make sure you have the perfect hair length. You hair should be the length of a grain of rice or, in simple terms, a quarter of an inch before waxing. If your hair is too short, let it grow girl! If it’s too long, give it a quick trim.
Consistency with your skin care is the key to having smooth and buttery soft skin post-waxing. Cleanse your skin every day, and moisturize using a hydrating cream or moisturizer regularly. You can thank us later for your healthy, plump, and glowing skin.
Exfoliating twice a week gets rid of the dead skin cells and dirt build-up on your skin. This ensures a smoother waxing experience and prevents ingrown hair.
Taking a warm shower before waxing opens up your pores and softens the hair follicles, making hair removal a breeze.
After you hop out of the shower on the day of waxing, skip the moisturizer. If your skin is too hydrated and greasy, the wax won’t stick to it.
Now you’re all prepped and primed, let’s go wax!
Gather Your Tools: The First Step to Waxing at Home with a Waxing Kit
Who said you can’t recreate a perfect salon-like wax at home? Stock up on the right supplies and you can be a pro waxer too!
Here’s a checklist of things you need before you get waxing:
- Hard wax
- Wax warmer/ microwave
- A couple of spatulas
- A small mirror
- A large mirror
- A rug
- A pillow
- A piece of cloth
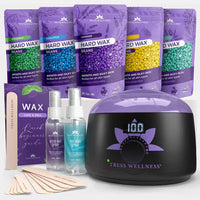
Or just grab your home waxing kit and mirrors to get started! Home waxing kits are an excellent investment to make at-home waxing a regular thing. The Tress Wellness waxing kit is one of the best at-home waxing kits and it comes with everything that you need for waxing by yourself– wax warmer, hard wax beads, spatulas and pre-wax and after-wax care sprays.
Get your hands on the Tress Wellness waxing kit, and you’ll be all set to get the professional waxing experience at home!
The Step-by-Step Guide to Wax with an At-Home Waxing Kit
Step 1- Warm up your wax beads
Set your wax warmer to 150-175 degrees Fahrenheit. Your wax should look something like honey.
Step 2- Scoop up your wax and spread it thick
Next, we apply the wax gently. Pull your skin taut with two fingers, and use the other hand to spread the wax nice and thick. Go at least for two layers. This helps the wax stick to the hair properly. Apply your wax in the direction of the hair growth.
Here's how you apply your wax better.
@tresswellness_waxingkit How to apply hard wax like a pro ✅ #waxing #hardwax #howtowax #waxingforbeginners #USA ♬ original sound - Tress Wellness Waxing Kit 💜
Step 3: Wait for the wax to cool down
Wait a few seconds for the wax to cool down and harden.
Step 4: Pull off the wax
Pull your skin taut with one hand, and pull the wax off, close to your body, in the opposite direction.
Step 5: After-wax spray
In the last step, apply the post-wax spray to remove any wax residue and calm the skin.
Aftercare After Party: Taking Care of Your Skin Post-Waxing
Your skin needs some extra bit of love post-waxing. The pulling and tugging from waxing can create some irritation, redness and inflammation. With some love and aftercare, your skin will be rejuvenated in no time.
Use a soothing gel or spray after waxing

The gentle formula of the soothing gel or spray cools and hydrates the skin, leaving you with a refreshing sensation.
Do a quick ingredient check before opting for a soothing after-wax gel or spray.
Your after-wax soother should contain at least one of the following ingredients:
1. Aloe Vera: Known for its cooling and anti-inflammatory properties, aloe vera helps to soothe and calm irritated skin.
2. Chamomile: Chamomile has anti-inflammatory and antioxidant properties that help to reduce redness and irritation.
3. Witch Hazel: This natural astringent has anti-inflammatory properties and helps to tighten pores while reducing irritation.
4. Calendula: Calendula extract can promote skin healing and reduce inflammation, making it great for post-waxing care.
5. Cucumber Extract: Cucumber has a soothing and cooling effect on the skin, helping to alleviate redness and irritation.
6. Hyaluronic Acid: This ingredient provides deep hydration to the skin, helping to maintain its moisture balance.
7. Panthenol (Vitamin B5): Panthenol helps to improve skin hydration and promotes healing.
8. Allantoin: Allantoin is known for its soothing and skin-regenerating properties.
But if you want a sure-shot after-wax soother, the Tress Wellness after-wax spray, that comes inside your home wax kit, is the perfect solution. Enriched with aloe vera and chamomile, it instantly calms and hydrates post-waxing. Say hello to painless bliss with Tress Wellness After-Wax Spray!
Say “No” to Sun Exposure for Two Days
You've just aced your at-home waxing session, and that smooth skin deserves to shine! But here's the deal: For the next 48 hours, let's keep that glow away from the harsh sun. It's a smart move to either cover up or reach for the sunscreen to shield your freshly waxed skin.
Keep It Cool, Skip the Sweat
Let's talk about the importance of avoiding exercise and heavy sweating for the next 24-48 hours. Why, you ask? Well, after waxing, your hair follicles are open and vulnerable to bacterial growth and potential irritation. Engaging in rigorous physical activity or sweating profusely during this time can increase the likelihood of skin issues, including redness or even ingrown hairs.
Post-waxing Pool Rules
We get it; some waxing sessions are all about getting ready for those perfect pool days or beachfront bliss. But hold that thought for a moment! Freshly waxed skin, especially after a bikini or Brazilian wax, needs a bit of post-wax pampering.
Jumping into water, whether it's filled with a chemically treated pool or the salty sea, can spell trouble for your skin. It's like throwing a party and inviting irritation, redness, and potential ingrown hair to join in.
So, here's the scoop: do not hop into the water for at least 24-48 hours after waxing. Let your skin recover and rejuvenate.
Tame the Pain: How to make waxing at home less painful?
You don’t have to wince in pain every time you rip off your wax. We have some sure-shot tips for you to take the pain a notch down while waxing at home.
1. Choose Hard Wax
Hard wax is gentler on your skin, especially if you have delicate and sensitive skin. Hard wax only sticks to your hair and does not tug at your skin when you pull it off.
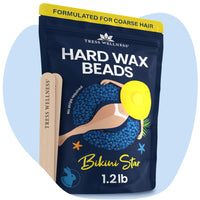
The Tress Wellness at-home wax kit comes with a bundle of hard wax beads formulated with skin-loving ingredients for a pain-free waxing experience. As a bonus, we also have the Bikini Star Beads that are formulated especially for waxing the delicate skin down south!
2. Let Your Hair Grow
For a smoother and less painful bikini waxing, you need to grow your hair out. It should be at least 1/4th of an inch or at least the length of a rice grain. This way there’s so much more that your wax can grab and you won’t have to go through the pain without getting any of the hair removed.
3. Trim Your Hair if it’s Too Long
The right length of hair matters a lot in terms of how much pain you’re likely to feel. The wax cannot pull out hair that’s too long. It tugs at the hair without removing it completely. Ouch! Do not put yourself through that pain. Trim your hair to a quarter of an inch, and go ahead.
4. Apply Pressure with Your Palm
One of our more popular superstar tips is to apply pressure on your bikini line with your palm as soon as you pull off your wax. Rubbing the area gently along with applying pressure helps take away from the sensation of pain.
5. Don’t Wax around or during Your Period
Waxing and periods? Let's not mix the two! Waxing during your periods can bring extra discomfort due to heightened sensitivity. The body's pain receptors are a tad more active during this time, making the experience less enjoyable. So put away your waxing kit for another time when you’re not on your period.
6. Don’t Drink Caffeine before Waxing
When it comes to a pain-free waxing experience, avoiding that pre-wax espresso or energy drink can be the best decision you take. Caffeine can heighten your skin's sensitivity, making the waxing process feel more intense than it needs to be.
And there you have it—your complete guide to home-waxing. You don’t need to spend a fortune to get salon-like results anymore. Our waxing guide ensures that you use your at-home waxing kit to the fullest and get bump-free wax.
Comment below if you have tried your hands at home waxing, and share this blog with a friend who needs to try waxing at home. hi to easy-breezy waxing sessions.


