Want to achieve salon-like hair removal at home? A hard wax kit allows you to do just that. In this article, you’ll discover top-rated hard wax kits, understand their key features, and learn how to use them for smooth, hair-free skin. Whether you’re a beginner or an experienced user, we’ve got you covered.
Key Takeaways
-
The Tress Wellness hard wax kit is perfect for both beginners and pros, offering professional salon-quality results at home.
-
The kit includes essential tools like a digital wax warmer, hard wax beads, spatulas, and pre and post-wax sprays for comprehensive hair removal.
-
Following proper techniques and maintenance tips enhances your waxing experience, ensuring effective hair removal and minimal discomfort.
What's Inside the Tress Wellness Hard Wax Kit
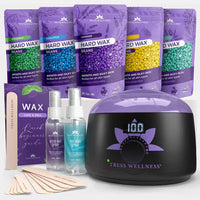
Curious about what makes the Tress Wellness Hard Wax Kit so special? Let’s take a closer look at what’s inside. The kit includes a high-quality digital wax warmer with a user-friendly digital display. This feature allows for precise temperature control, ensuring the wax melts to the perfect consistency for effective application.
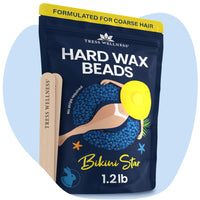
In addition to the wax warmer, the kit comes with five bags of hard wax beads, formulated with natural ingredients to suit all skin types. These hard wax beads are designed to be effective on various body areas, including sensitive spots like the bikini line, making them a versatile choice for all your hot wax needs. The natural formulation ensures that even those with sensitive skin can enjoy a gentle yet effective hair removal process.

Before waxing:
To complete the set, the kit includes a variety of spatulas for applying the wax, protective rings to keep the waxing area clean, and both pre-wax and after-wax sprays. The pre-wax spray preps your skin, ensuring it’s clean and hydrated, while the after-wax spray soothes and calms the skin post-waxing.
After waxing:
The kit includes:
-
A variety of spatulas for applying the wax
-
Protective rings to keep the waxing area clean
-
Pre-wax spray, which preps your skin, ensuring it’s clean and hydrated
-
After-wax spray, which soothes and calms the skin post-waxing
With this all-in-one home waxing kit, you’re fully equipped for a professional-grade waxing experience right at home.
How to Use Each Product in the Hard Wax Kit
Using the Tress Wellness hard wax kit is simple and straightforward, provided you follow the manufacturer’s guidelines for optimal results. The process involves several key steps: preparing your skin, melting the wax, applying the wax, removing the wax, and post-wax care.
Here are the key steps for an effective waxing session.
Preparing Your Skin
Proper skin preparation is essential before waxing. Start by cleansing the area to remove any oils, dirt, or makeup that could interfere with the wax adhesion. The Tress Wellness kit’s pre-wax spray ensures your skin is clean and hydrated for optimal results. This preparation prevents infections and ensures proper wax adhesion.
Exfoliate a day or two before waxing to enhance wax effectiveness and minimize discomfort. This process removes dead skin cells, allowing the wax to grip hair better. Pre-wax care aims to keep your skin in optimal condition for a smooth session.
Melting the Wax
Melting the wax correctly is essential. Heat the hard wax beads using the digital wax warmer until they reach a honey-like consistency. The digital display allows precise temperature control for the ideal wax consistency.
Let the wax cool slightly before application to avoid irritation. The wax should be warm and comfortable to touch, resembling a caramel-like texture. These steps ensure the wax adheres well and is easy to spread.
Applying the Wax

Technique is key when applying wax. Spread the melted wax in the direction of hair growth using a spatula. This method ensures the wax adheres to the hair, minimizing pain and maximizing effectiveness.
Apply a thick enough layer of wax for effective removal. A thin layer might break, while a thick one can cause uneven removal. These guidelines help achieve a smooth and efficient process.
Removing the Wax
Correctly removing the wax is essential for effective hair removal and minimizing discomfort. Once the wax hardens, hold the skin taut and pull it off quickly in the opposite direction of hair growth. This method reduces pain and ensures hair is removed from the root.
Pull the wax strips firmly and quickly for best results. This swift action minimizes pain and maximizes hair removal.
Post-Wax Care
After waxing, proper skin care prevents irritation and maintains smoothness. The kit’s post-wax cooling gel soothes the skin and alleviates irritation. The gel calms the skin and restores moisture, keeping it hydrated and healthy.
Moisturizing the skin after waxing restores hydration and prevents irritation. These steps ensure your skin remains smooth, hydrated, and irritation-free, enhancing your waxing experience.
Waxing Tips for a Smooth Experience
A few additional tips can enhance your waxing experience. Choosing the right wax, avoiding mistakes, and maintaining your wax warmer will help achieve the best results.
Choosing the Right Wax for Your Hair Type
Selecting the right wax for your hair type is crucial for effective removal. For coarse hair or curly hair, choose waxes with a stronger hold. Hard wax typically works best for these types as it adheres better and pulls hair from the root.
Soft wax might be more effective for larger areas but it sticks to the skin as well as the hair. This makes it more painful to remove.
Avoiding Common Mistakes
Avoid common mistakes to improve your waxing results. A common error is applying the wax too thinly, making removal difficult and uncomfortable. Use the spatula to spread the wax thickly in the direction of hair growth.
Avoid waxing over open wounds or bruises to prevent aggravating the injury and causing further skin damage. These guidelines help minimize pain and ensure effective hair removal.
Maintaining Your Wax Warmer
Consistently maintaining your wax warmer ensures performance and hygiene. Regular cleaning prevents product buildup and ensures efficient operation. This practice extends the life of your wax warmer and ensures a hygienic experience.
Clean the wax warmer thoroughly after each use. Check the thermostat settings to avoid overheating and ensure proper consistency. Proper maintenance ensures a smooth and effective waxing process.
Why Choose Tress Wellness's Hard Wax Kit

The Tress Wellness hard wax kit is your ticket to a convenient and effective waxing experience, perfect for both beginners and experienced users. Why spend time and money at the salon when you can achieve professional results at home? This waxing kit is designed to be safe and suitable for all skill levels, ensuring a comfortable waxing experience every time.
With Tress Wellness, you’re not just buying a product; you’re investing in a waxing experience that promises smooth, hair-free skin with minimal effort. Embrace the convenience and effectiveness of at-home waxing kits and enjoy the freedom of hair-free days, all thanks to the Tress Wellness hard wax kit.
Summary
In summary, the Tress Wellness Hard Wax Kit offers a comprehensive, convenient, and effective solution for at-home hair removal. By following the steps outlined in this guide, you can achieve professional results and enjoy smooth, hair-free skin. Embrace the freedom and confidence that comes with a perfect waxing experience, and make Tress Wellness your go-to choice for all your waxing needs.
Frequently Asked Questions
Is the Tress Wellness Hard Wax Kit suitable for sensitive skin?
Absolutely, the Tress Wellness Hard Wax Kit is ideal for sensitive skin since its hard wax beads are made with natural ingredients. You can enjoy a gentle waxing experience without worry!
How do I prepare my skin before waxing?
To prepare your skin for waxing, start by cleansing it to remove any oils, dirt, or makeup, and consider using a pre-wax spray from your kit for added hydration. This simple step ensures a smoother and more effective waxing process!
What is the ideal consistency for the melted wax?
The ideal consistency for melted wax is similar to that of honey, which ensures smooth and even application. Aim for that texture for the best results!
How do I remove the wax effectively?
To remove wax effectively, pull it off quickly in the opposite direction of hair growth. This minimizes discomfort and ensures a better result.
What should I do after waxing to care for my skin?
After waxing, be sure to apply a cooling gel to soothe your skin and follow up with a good moisturizer to keep it hydrated. Your skin will thank you for it!


