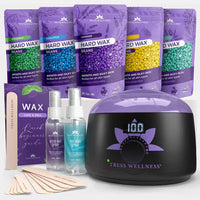
Tired of constantly shaving and dealing with stubble the next day? If you’re ready for long-lasting smooth legs, waxing at home is your best bet. But with so many options out there, how do you find the best leg waxing kit? Don’t worry – we’ve got you covered. Let’s dive into what makes the best home leg waxing kit and why the Tress Wellness Waxing Kit stands out from the rest.
What to Look for in the Best At-Home Waxing Kit for Legs

Not all waxing kits are created equal, especially when it comes to larger areas like your legs. Here’s what you need to ensure smooth, long-lasting results:
-
Hard Wax Beads (No Strips Needed): Hard wax is gentler on the skin and grips hair better, making it ideal for legs. Plus, no strip means less mess.
-
Wax Warmer: A reliable wax warmer ensures your wax melts evenly and stays at the perfect temperature throughout the session.
-
Pre-Wax and After-Wax Sprays: Pre-wax sprays cleanse and prep your skin, while after-wax sprays soothe and remove any lingering residue.
-
Applicator Sticks (Various Sizes): Wide sticks cover larger areas quickly, and smaller ones allow for precision around knees and ankles.
-
Detailed Instructions: A step-by-step guide is crucial if you’re a beginner.
-
Skin-Safe Ingredients: Look for wax that’s hypoallergenic and suitable for sensitive skin.
Why Tress Wellness Has the Best Home Leg Waxing Kit

The Tress Wellness Waxing Kit ticks all the boxes for a smooth, hassle-free leg waxing experience at home. Here’s why it stands out as the best leg waxing kit:
1. Premium Hard Wax Beads
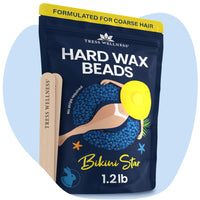
Our hard wax beads are formulated to tackle even the most stubborn hair while being gentle on the skin. They’re perfect for legs, gripping the hair tightly without irritating the skin.
2. Professional Wax Warmer
The Tress Wellness wax warmer melts wax evenly and keeps it at the perfect temperature throughout your session – no more reheating halfway through!
3. Pre and Post Wax Care
The kit includes:
-
Pre-Wax Spray – Cleans the skin, removes oils, and preps it for waxing.
-
After-Wax Spray – Calms, soothes, and removes any lingering wax, ensuring your skin feels soft and irritation-free.
4. Variety of Applicators
Wide applicators make covering large leg areas quick and easy, while smaller sticks help you wax around tricky spots like ankles and knees.
5. Hypoallergenic Formula
Our hypoallergenic wax beads are safe for sensitive skin, reducing the risk of redness or irritation.
6. Step-by-Step Guide
Whether you’re new to waxing or a seasoned pro, the kit comes with clear instructions to guide you through every step.
How to Use the Tress Wellness Waxing Kit for Perfectly Smooth Legs?

Achieving silky smooth legs at home is easy with the Tress Wellness Waxing Kit. Follow this step-by-step guide to get professional results:
Step 1: Prep Your Skin
-
Exfoliate your legs 24 hours before waxing to remove dead skin and prevent ingrown hairs.
-
On the day of waxing, spray the Tress Wellness Pre-Wax Spray onto your legs and gently wipe with a cotton pad. This removes oils and ensures the wax adheres properly.
Step 2: Heat the Wax
-
Pour your Tress Wellness Hard Wax Beads into the wax warmer.
-
Turn the warmer to medium heat and let the wax melt to a honey-like consistency. Stir occasionally with an applicator stick.
Step 3: Apply the Wax
-
Test the wax temperature on a small patch of skin to ensure it’s not too hot.
-
Using a wide applicator stick, apply a thick layer of wax in the direction of hair growth. Work in sections – start from the top of your leg and work your way down.
Step 4: Remove the Wax
-
Once the wax has cooled and hardened (about 30 seconds), hold the skin taut and quickly pull the wax off in the opposite direction of hair growth.
-
Repeat until both legs are hair-free.
Step 5: Aftercare
-
Apply the Tress Wellness After-Wax Spray to soothe the skin and remove any leftover wax.
-
Avoid tight clothing and exfoliation for 48 hours to prevent irritation.
Tips for the Best At-Home Leg Waxing Results
1. Prep Your Hair Length
The ideal hair length for waxing is about ¼ inch. This allows the wax to grip the hair effectively, ensuring smooth removal. If your hair is too short, the wax may not catch it properly, leaving behind patches. On the other hand, if the hair is too long, waxing can be more painful. If necessary, trim your leg hair to the right length before starting.
2. Wax in Small Sections
Work in small sections to ensure even hair removal. Waxing large areas at once can lead to missed spots and increase discomfort. Smaller sections allow for better control and precision, especially around trickier areas like the knees and ankles, where hair often grows in different directions.
3. Keep the Skin Taut
Holding your skin taut while applying and removing wax reduces pain and prevents bruising. Stretching the skin creates a smoother surface, allowing the wax to grip the hair better, which minimizes irritation and maximizes hair removal. This step is especially important for areas like the shin and behind the knee.
4. Post-Wax Skincare
After waxing, avoid applying lotions or oils for at least 24 hours. Let your skin breathe and recover to prevent clogged pores or breakouts. Freshly waxed skin is sensitive, and using heavy products too soon can lead to irritation. Instead, apply a soothing after-wax spray, like the Tress Wellness after-wax spray, to calm the skin.
5. Avoid Tight Clothing and Sweating
For the first 24-48 hours, steer clear of tight clothes and activities that cause heavy sweating. Your pores are open after waxing, making your skin more susceptible to irritation. Loose-fitting clothing and a break from intense workouts will help prevent ingrown hairs and discomfort.
6. Stay Consistent with Waxing
Regular waxing weakens hair follicles over time, resulting in finer and sparser regrowth. Wax every 3 to 4 weeks to maintain smooth skin and gradually reduce hair density. Sticking to a schedule not only keeps your legs consistently smooth but also makes each waxing session easier and less painful.
Why Waxing at Home is Better for Your Legs (and Your Wallet!)
Salon waxing appointments can cost anywhere from $50-$100 per session. With the Tress Wellness Waxing Kit, you’ll get multiple full-leg waxes from one kit, saving you hundreds in the long run. Plus, you can wax on your schedule – no appointments needed.
Conclusion
When it comes to smooth, long-lasting results, the Tress Wellness Waxing Kit is hands down the best at-home waxing kit for legs. With everything you need in one box, you’ll feel like a pro in no time. Ditch the razor and embrace silky smooth skin with a waxing kit designed for the ultimate at-home experience.


