Smooth underarms are a confidence booster, and waxing armpit is a preferred method for many. Learn how to wax your armpits effectively, addressing common questions and concerns without the fluff. Get ready for a clear, concise guide to help you achieve that flawless finish with waxing armpit techniques.
The Essentials of Underarm Waxing
Underarm waxing isn’t just about yanking out hair. It’s a skincare revolution that keeps your underarm hair-free for longer, reduces ingrown hairs, and even helps with body odor. Mastering this art involves understanding the rhythm of your hair growth and selecting the appropriate underarm wax.
Understanding Hair Growth
You see, your armpit hair, a type of body hair, is a bit of a rebel. As hair grows, it tends to grow in different directions, making waxing a bit tricky. And to add to the complexity, your hair has three growth stages: anagen (active growth), catagen (transition), and telogen (resting).
Waxing during the anagen phase is like hitting the jackpot because the hair gets yanked out from the root, leading to longer-lasting smoothness.
Choosing the Right Wax

For smooth underarms, Tress Wellness Hard Wax Beads are a top pick. They work great for most skin types and make waxing easier and less painful.

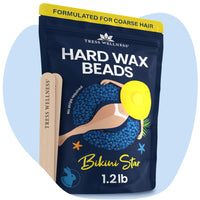
But if you have really sensitive skin, you might want to try the Bikini Star Beads from Tress Wellness. These beads are made to be extra gentle and are perfect for sensitive spots like your bikini area and underarms. They grab onto hair firmly but are soft on your skin, so waxing feels more comfortable.
Using Bikini Star Beads means you can wax your underarms without worrying about irritation. You'll end up with silky, hair-free underarms and a waxing experience that's kinder to your skin.
Pre-Wax Prep for Perfectly Smooth Underarms
Before embarking on your waxing journey, it’s necessary to prepare your underarms thoroughly. A bit of exfoliation to get rid of dead skin cells and a good scrub with soap and water will set the stage for a smooth and successful waxing session.
Skin Exfoliation
Exfoliation prior to waxing ensures your skin gets a VIP pass to the realm of smoothness. It clears the stage, making sure the wax latches onto the hair and not your skin. So, grab a slightly rough towel soaked in lukewarm water or a gentle oatmeal scrub and give your skin some love before the main event.
Clean and Trim
For a seamless waxing session, ensure that your underarm hair length is approximately 1/4 inch. This is the sweet spot that allows the wax to grab hold and give you a cleaner removal. So, give those underarms a good scrub with soap and water, trim the hair if needed, and you’re ready to roll!
The Art of Applying Wax
With your underarms adequately prepared, it’s now time to introduce the wax. But remember, applying wax isn’t just about slathering it on. You need to test the wax temperature and apply it in the right direction to ensure a seamless waxing experience.
Testing Wax Temperature
Before fully committing, conduct a small temperature test on your wrist with the hot wax. Too hot, and you might end up with burns. Too cold, and the wax won’t work its magic. You should set the temperature of your wax warmer to 150-170°F
The perfect temperature is when the wax flows like honey.
Applying the Wax: Mastering the Technique
Applying the wax correctly is crucial to a successful underarm waxing session. Here are some steps to help you master the technique:
-
Cleanse the underarm area: Begin by cleansing your underarms. This will help remove any oils or lotions that could hinder the wax from adhering properly.
-
Pick up the wax: Using the spatula provided in your Tress Wellness hard wax kit, scoop up a generous amount of the melted wax. Make sure the wax is sticking to the spatula before you proceed to the next step.
-
Apply the wax: Hold the spatula at a 45-degree angle to your skin. This allows for a more controlled application. Spread a thin layer of the Tress Wellness hard wax onto your skin, following the direction of hair growth. Ensure the wax is spread evenly for consistent results.
-
Let it cool: Allow the wax to cool and harden slightly. This will make it easier to remove. This will make it easier to remove. But before you let it cool completely, curl a small section at the end of the spread wax upwards. This will act as a grip when you're ready to remove the wax.

Removing the Wax: The Perfect Pull
Removing the wax correctly is just as important as applying it. Here's how to ensure a clean, smooth pull:
-
Check the wax: Before you remove the wax, ensure it's cooled enough to be hard but still flexible. If it's too soft, it won't effectively remove the hair. If it's too hard, it could shatter, making it difficult to remove.
-
Pull the skin taut: Use one hand to pull the skin taut in the direction opposite to the wax application. This will help minimize discomfort and make the hair easier to remove.
-
Remove the wax: With your other hand, swiftly pull the wax off in the opposite direction of hair growth. Try to keep the motion parallel to the skin rather than pulling upwards to reduce discomfort.
-
Clean the area: After you've removed the wax, cleanse your underarms again to remove any residual wax and soothe the skin. Use the Tress Wellness post-waxing spray to cleanse and soothe your underarms.
Here's a quick video tutorial on how to wax your armpits:
@tresswellness_waxingkit How cute was the dog? 😭 #bodyhair #waxing #hairyarmpits #underarmwax #hardwax #waxing #USA ♬ original sound - Tress Wellness Waxing Kit 💜
Aftercare: Soothing Your Skin Post-Wax
Post-waxing, your skin merits a bit of pampering. Post-wax care is all about soothing and protecting the skin, removing any excess wax, and calming any irritation or redness to soothe the skin.
Removing Excess Wax and Calm the Skin
Post-waxing your underarms needs a bit of extra care. Spritz the Tress Wellness's post-waxing spray a couple of times to the area and remove any excess wax with a cotton pad. This spray, enriched with aloe vera and chamomile, also soothes the freshly waxed underarm skin.
Wardrobe Wisdom Post-Waxing
Post-waxing, allow your underarms to breathe by avoiding tight clothing. Opt for loose-fitting clothes to prevent any unnecessary rubbing and irritation.
Think tank tops or singlets – not only are they stylish, but they also provide the comfort and convenience your skin needs post-waxing.
Maintaining Your Waxing Schedule with WaxPal
Maintaining a consistent routine is imperative for underarm waxing. WaxPal, an all-in-one at-home waxing guide and scheduler app, can help you stay on top of your waxing schedule. It even offers learning opportunities from licensed estheticians to help you master the art of waxing.
Addressing Common Concerns and Missteps
It’s time to tackle common underarm waxing concerns and missteps head-on. Whether it’s waxing over irritated skin or using wax that’s too hot, these missteps can lead to skin issues such as redness, inflammation, and ingrown hairs. But don’t worry, with the right knowledge and approach, you can prevent ingrown hair and other issues that may arise from underarm waxing.
Maximizing Results with Tress Wellness

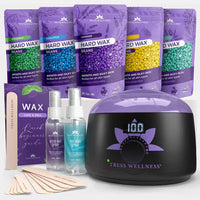
Having mastered underarm waxing, it’s time to elevate your game. With the Tress Wellness all-in-one waxing kit, you can maximize your waxing results. This kit includes:
-
Wax warmer
-
4 bags of hard wax beans (different scents)
-
10 applicator sticks
-
Pre-wax spray
-
After-wax oil
-
Instruction manual
Suitable for all skin and hair types and dermatologically tested for safety, this kit is your ticket to a flawless waxing experience.
Frequently Asked Questions
Is it good to wax your armpits?
Absolutely! Waxing your armpits can provide longer-lasting results compared to shaving and can leave your skin feeling smoother and hair-free. So go ahead and give it a try for a longer-lasting and smoother underarm experience!
Does waxing armpits make hair thicker?
Nope, waxing doesn't make hair thicker. It may seem thicker when you shave because you're cutting the tip, but waxing won't change the hair thickness. Cheers!
What are the rules for armpit waxing?
To achieve the best results for armpit waxing, ensure the hair is no longer than a quarter of an inch, exfoliate the skin before the appointment, and avoid tanning or swimming for at least 24 hours before the session. Remember not to wax sensitive skin or the same area twice, and consider aftercare for the best results.
Does waxing armpits reduce body odor?
Waxing your armpits can help reduce body odor by removing dead skin cells, although it may not completely eliminate it if there are other contributing factors like diet or hormonal changes. So, keep in mind that it's not a magic solution, but it can definitely help freshen things up.
How often should I wax my underarms?
You should aim to wax your underarms every 2-4 weeks, taking into account your hair growth patterns. Regular waxing can lead to smoother and easier sessions in the long run. Flaunt those underarms with confidence!
Underarm waxing doesn’t have to be a chore. With the right knowledge, tools, and techniques, it can transform your skincare routine and give you smooth, hair-free underarms. So, why not give it a try? After all, your underarms deserve the special treatment too!


